$diff = human_time_diff( '2012-05-05 12:05:00', '2012-05-05 12:10:00' );
echo 'This comment was submitted ' . $diff . 'ago';

// Output: This comment was submitted 5 minutes ago
How to get Custom Taxonomies
This will out put your Custom Taxonomies associated with the post. It will also create the permalink to the Custom Taxonomy
ID, 'my_custom_tax') ?>
Top Level Ancestor Page Title and or ID#
Echo Name
ID)))->post_title; ?>
Echo ID#
ID)); ?>
How to List Child Pages of a Custom Post Type
How to List the direct Child or Children of the current Post of a Custom Post Type. The depth is set to 1 so it will only show the direct children and not the children’s children.
 1,  // How far to show, 2=shows child and grandchild 0=all

	'child_of'     => $post->ID, // Show Child of Current Post

	'exclude'      => '',

	'include'      => '',

	'title_li'     => '',  // Do not Show a Title

	'echo'         => 1,

	'authors'      => '',

	'sort_column'  => 'menu_order, post_title',

	'walker'       => '',

	'post_type'    => 'custom_post_tpe_name', // Post Type Name

    'post_status'  => 'publish'

); ?>
Create Sidebar Boxes with the Advanced Custom Fields Repeater
Use Advanced Custom Fields Repeater to create new sidebar boxes on your WordPress Website. This basically gives the user the ability to add custom sidebar boxes without getting into any code. Here’s what we are going to do. Give the ability to add a Title to the Box, Give it a Content Area, and the ability to choose what color the box will be.
This uses the Advanced Custom Fields Plugin – Free
And the ACF repeater plugin – $25 AUD
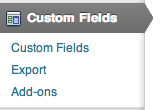
First we set up our Custom Fields. Go to Custom Fields, and add new. Let’s call this one “Sideboxes”


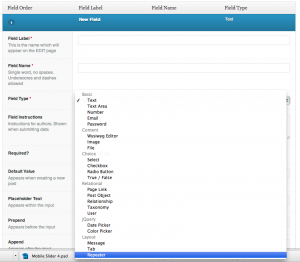
Then, “Add Field” and choose the repeater option at the bottom:

Then click, “Add Sub Field”.
Create 3 Fields, one called:
“Title” and choose the text as your field type
“Contents” and choose the wysiwyg as your field type
“Color” and choose radio button as your field type. The enter, “green” “orange” “purple” as your radio choices.
Remember to choose your location to where you want the Repeater box to show, for example: pages, or a page template. And save.
Then we open up our sidebar.php template file and add a loop to pull the fields.
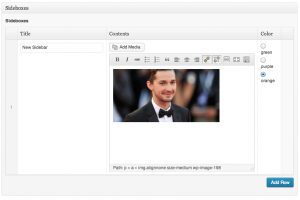
Because the if statement is out side of any markup, the div will not show unless the fields have been field out on the page where your repeater is located. So let’s go through that process. Go to one of the pages that you located the Sideboxes on. Click “Add Row” in the new metabox that shows now that you created your new Custom Field.

Fill in the Title, Contents and Choose your color and save the post or page.

We have the markup, we have the contents, now we need style. Lets add some items to our css. We’ll add a green, purple and orange class to give our boxes some color.
.sideitem {
	width: 260px;
	padding:20px;
	position: relative;
	float:left;
	color: #fff;
	margin-bottom: 15px;
}
.sideitem h3 {
	font-size: 18px;
	font-weight: 300;
	letter-spacing: 2px;
}
.green {background-color: #00845D;}
.purple {background-color: #565F98;}
.orange {background-color: #D56431;}
How to Query a Custom Post Type on a Page and have it Paginate
Here’s the scenario. Say you have a page called, “I like music”. And on that page you want to show posts from your Custom Post Type, “Songs”. You want to show 5 posts with the ability to click “next page” to show 5 more posts. You can do a custom query easily enough, but you need to set the query to paged to get pagination to work. Here’s how to do it.
Put the query right before the loop.
 'songs',   // Custom Post Type
    'paged' => $paged,       // Set it up to be paged so you can use pagination
    'posts_per_page' => 5    // How many to show per page
) );
?>
All that’s left is to set your pagination. You can learn how to do that here.
How to show Multiple Custom Post Types that share Custom Taxonomies
This is a sample query where the home page would show all custom post types that shared the custom taxonomy, “Front Page”
First, we set up our Custom Post Types in the theme’s function.php file. We will create post types called, “Blog”, “Biology”, “Biodiversity”, and “Filmmaking”.
Continue reading
How to get responsive Images
A good specific way to use responsive images is when you setup a site that gets updated by the client. You want to control the way the image that they upload gets shown. Enter, responsive images. You have to have it respond when they upload all ranges of sizes. And you have to have it conform to your template. Otherwise, you’d just do it yourself, right?
Ok,add this:
img {
	max-width: 100%;
	height: auto;
}
Viola!
How to have Pagination on a Custom Template Page
First, follow the directions here on how to setup your pagination function and styling. Then you can change your page template file with a special query that tells it to be ‘paged’.
Simply go into your page template file and look for the beginning of your loop (I’m assuming that the page was set up to pull some extra posts and not just the page content). it should look something like this:
 1,
	'posts_per_page' => 3,
	)); ?>
Change it to look like this:
 1,
        'posts_per_page' => 3,
	'paged' => $paged
);
query_posts($args); ?>
This little guy right here:
'paged' => $paged
tells it to show other pages with other posts.
How to have a responsive YouTube video embed
It’s so easy it’s ridiculous. Simply surround your embed with a containing div that we can style the YouTube video responsively.
Then we add a dash of css.
.video-container {
    position: relative;
    padding-bottom: 56.25%;
    padding-top: 30px; height: 0; overflow: hidden;
}

.video-container iframe,
.video-container object,
.video-container embed {
    position: absolute;
    top: 0;
    left: 0;
    width: 100%;
    height: 100%;
}
