All posts by acrane

About acrane

A web designer from Charlotte, NC, I enjoy working in the yard, kayaking, building stuff, making things, creating, thinking and of course WordPress.

Redirect User based on role or capability on login

Redirect user based on role or capability on login. You can add else if’s to direct different users. has_cap accepts roles or capabilities. So you could use, “edit_posts” for a check.

Add to functions file.

/**
 * WordPress function for redirecting users on login based on user role
 */
function my_login_redirect( $url, $request, $user ){
    if( $user && is_object( $user ) && is_a( $user, 'WP_User' ) ) {
        if( $user->has_cap( 'administrator' ) ) { // this can be role, or capability
            $url = admin_url();
        } else {
            $url = home_url('/members-only/');
        }
    }
    return $url;
}

add_filter('login_redirect', 'my_login_redirect', 10, 3 );
Query Database for all ACF repeater Datepickers and list them in order by date

This sample will query the database for the Custom Field of “birth”, a repeater date picker setup to show a persons birthday. It will pull all birthdays in the month of June and list them in order. This example will also pull the name field that is in the same repeater by referencing the postmeta ID of the row. This was adapted from the example on the ACF website.

You may have to change your table prefix and your field names.

get_results($wpdb->prepare( 
            "
            SELECT * 
            FROM we_postmeta
            WHERE meta_key LIKE %s
               AND meta_value LIKE %s
		ORDER BY meta_value ASC;
			",
            'repeater_%_birth', // meta_name: $ParentName_$RowNumber_$ChildName
            "____06__" // meta_value:
		 ));
		
	// loop through the results
	if( $rows )
	{
		foreach( $rows as $row )
		{
// for each result, find the 'repeater row number' and use it to load the info!
	preg_match('_([0-9]+)_', $row->meta_key, $matches);
			
// Load the birth dates from the repeater field
	$meta_key = 'repeater_' . $matches[0] . '_birth'; // $matches[0] contains the row number!
			
// Get the names from the repeater field
	$names = 'repeater_' . $matches[0] . '_name'; // $matches[0] contains the row number!
 
//  use get_post_meta to load the info
// - http://codex.wordpress.org/Function_Reference/get_post_meta
	$birth_id = get_post_meta( $row->post_id, $meta_key, true );
	$name = get_post_meta( $row->post_id, $names, true );
// Delet the year
	$finalFormat = DateTime::createFromFormat('Ymd', $birth_id);
?>


format('M d'); ?>

Note: if you wanted to pull the current month, you could pass a php variable in to the query.

$currentMonth = date('m'); 

$rows = $wpdb->get_results($wpdb->prepare( 
            "
            SELECT * 
            FROM we_postmeta
            WHERE meta_key LIKE %s
               AND meta_value LIKE %s
		ORDER BY meta_value ASC;
			",
            'repeater_%_birth', // meta_name: $ParentName_$RowNumber_$ChildName
            "____${currentMonth}__" // meta_value passed from php variable
		 ));

Advanced Custom Fields Image Object

Functions file for size:

add_image_size( 'custom-size', 220, 180 ); // 220 X 180, soft proportional crop mode
add_image_size( 'custom-size', 220, 180, true ); // 220 x 180 , hard crop mode
add_image_size( 'custom-size', 220, 220, array( 'left', 'top' ) ); // Hard crop left top

x_crop_position accepts ‘left’ ‘center’, or ‘right’.
y_crop_position accepts ‘top’, ‘center’, or ‘bottom’.


jQuery make two divs have equal height

Your Two divs:

Not much stuff and very short.
A ton of stuff on multiple lines. A ton of stuff on multiple lines. A ton of stuff on multiple lines. A ton of stuff on multiple lines. A ton of stuff on multiple lines. A ton of stuff on multiple lines.

Your simple css:

#div1 {
   width: 200px;
   float: left;
   background-color: #0CF
   padding: 10px;
}
#div2 {
   width: 200px;
   float: left;
   background-color: #f47a21;
   padding: 10px;
}

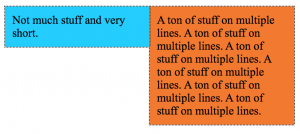
Gives you this:
Screen Shot 2014-05-30 at 10.57.04 AM

But we want equal heights even if the content changes. So we add some jQuery:

var currentTallest = 0,
     currentRowStart = 0,
     rowDivs = new Array(),
     $el,
     topPosition = 0;

 $('.blocks').each(function() {

   $el = $(this);
   topPostion = $el.position().top;
   
   if (currentRowStart != topPostion) {

     // we just came to a new row.  Set all the heights on the completed row
     for (currentDiv = 0 ; currentDiv < rowDivs.length ; currentDiv++) {
       rowDivs[currentDiv].height(currentTallest);
     }

     // set the variables for the new row
     rowDivs.length = 0; // empty the array
     currentRowStart = topPostion;
     currentTallest = $el.height();
     rowDivs.push($el);

   } else {

     // another div on the current row.  Add it to the list and check if it's taller
     rowDivs.push($el);
     currentTallest = (currentTallest < $el.height()) ? ($el.height()) : (currentTallest);

  }
   
  // do the last row
   for (currentDiv = 0 ; currentDiv < rowDivs.length ; currentDiv++) {
     rowDivs[currentDiv].height(currentTallest);
   }
   
 });

Now we have to add the blocks class to the divs that we declared in the jQuery:

Not much stuff and very short.
A ton of stuff on multiple lines. A ton of stuff on multiple lines. A ton of stuff on multiple lines. A ton of stuff on multiple lines. A ton of stuff on multiple lines. A ton of stuff on multiple lines.

Yay! Equal div heights.
Screen Shot 2014-05-30 at 10.57.50 AM

Search Users by Last Name with a Link to the Author Page


prepare() is a fast and safe method for performing a MySQL query $stmt = $wpdb->prepare("SELECT user_id FROM $wpdb->usermeta AS um WHERE ( um.meta_key='last_name' AND um.meta_value LIKE '%%%s%%') OR (um.meta_key='last_name' AND um.meta_value LIKE '%%%s%%') ORDER BY um.meta_value LIMIT 150", $usersearch, $usersearch ); //results are cached in the variable $results using get_col() $results = $wpdb->get_col( $stmt ); } ?>
"; echo ""; //now we can loop through the $metanames variable foreach($metanames as $m){ echo ""; } ?> "; ?> View "; echo ""; } ?>
"; //$u is going to be the users id echo $u; echo ""; echo esc_attr( get_user_meta( $u, $m, true ) ); echo "

Useful stuff for the Author.php page

Let’s pull lots of stuff about the Authors on the author.php page.

First we’ll see what author we are showing…

$author = get_user_by( 'slug', get_query_var( 'author_name' ) );

Then we can do lots of cool stuff.

Echo authors first name:

echo $author->first_name;

More parameters can be found here.

Show Advanced Custom Fields assigned to the Users:

$youField = get_field('your_custom_field', 'user_'. $author->ID );
echo $youField;

Here’s another example of ACF Author info showing the Birthdate custom field:

$date = DateTime::createFromFormat('Ymd', get_field('birthday', 'user_'. $author->ID ));
$birthdate = $date->format('M j');
echo $birthdate;

Finally, how to show a custom taxonomy associated with a User.

$terms = get_the_terms( $author->ID , 'profession' ); 
  foreach ( $terms as $term ) {
  $term_link = get_term_link( $term, 'profession' );
if( is_wp_error( $term_link ) )
continue;
echo '' . $term->name . '';
}

This pulls the terms from the Custom Taxonomy, “profession” that is associated with the user. This example expands on a demo created by this smart guy on how to create Custom Taxonomies for Users. (note that he is missing his first add action in his example. you can figure out how to fix it in his comments section.)

Changing the Hosts File on a Mac OS X Lion 10.7 and later

Sometimes you want to move a website to a new server and test it before pointing the record to the new server and the new site. The following steps will tell you computers browsers to look at the new server while the rest of the world will still view the old one. Yay!

Open Terminal:

sudo nano /etc/hosts

enter you password and hit enter. (you won’t see the password being typed)

use the arrow keys to go down to the next available line and enter your ip and url you want to view.

## WP Munchies Site
xxx.xx.xx.xxx www.wpmunchies.com
xxx.xx.xx.xxx wpmunchies.com
xxx.xx.xx.xxx http://www.wpmunchies.com
xxx.xx.xx.xxx https://wpmunchies.com

(obviously the x’s will be replaced with the ip you will be pointing to.)

Hit Control+O to write out. Hit Enter. A report will write, and you can hit Control+X to exit the nano report.

If your changes don’t take immediate affect, you can do the prompt:

sudo killall -HUP mDNSResponder

Output lists or paragraphs in multi column format

ul {
    list-style: none;
    margin:0;
    padding:0;
}
ul > li {
    display: inline-block;
    width: 100%;
}
ul > li > ul >li {
    color: red;
}
div {
    -webkit-column-count:3;
    -moz-column-count:3;
    -ms-column-count:3;
    -o-column-count:3;
    column-count:3;
    -webkit-column-gap:15px;
    -moz-column-gap:15px;
    -ms-column-gap:15px;
    -o-column-gap:15px;
    column-gap:15px;
    columns:3;
}
  • List item 1
  • List item 2
  • List item 3
  • List item 4
  • List item 5
  • List item 6

Gives You:

  • List item 1
  • List item 2
  • List item 3
  • List item 4
  • List item 5
  • List item 6

Sample collapsable div jQuery Script with Advanced Custom Fields Repeater

Sample collapsable div jQuery Script with Advanced Custom Fields Repeater

html:


Learning Training Topics

VIEW OUTCOME

CSS:

#learning-training-topics {
	/*border-bottom: 1px solid #ccc;*/
	margin-bottom: 30px;
}
.learning-training-topic {
	width: 600px;
	float: left;
	margin-bottom: 20px;
}
.read-outcome-line {
	width: 100%;
	border-bottom: 4px solid #eee; 
	position: relative;
	float: left;

}
.read-outcome {
	cursor: pointer;
	width: auto;
	background-color: #eee;
	border-radius: 5px 5px 0px 0px;
	padding: 5px 20px;
	position: absolute;
	top: -28px;
	right: 20px;
	font-size: 12px;
}
.show-outcome {
	max-height: 0px;
	overflow: hidden;
	padding-bottom: 0px;	

}
.training-topic {
	font-weight: bold;
	margin-bottom: 5px;
	background-image: url(images/branded-bullet.png);
	background-repeat: no-repeat;
	background-position: -2px 1px;
	padding-left: 20px;	
}
.training-topic-line-2 {
	font-weight: bold;
	margin-bottom: 40px;
	font-size: 12px;
	padding-left: 20px;	
}
.training-topic-coming-soon {
	font-weight: bold;
	margin-bottom: 40px;
	background-image: url(images/branded-bullet.png);
	background-repeat: no-repeat;
	background-position: -2px 1px;
	padding-left: 20px;	
}
#learning-training-topics ul li {
	list-style: none;
	background-image: url(images/branded-bullet.png);
	background-repeat: no-repeat;
	background-position: -2px 3px;
	margin: 0 0 10px 16px;
	padding: 0 0 0 20px;

}
#learning-coming-soon {
	border-bottom: 1px solid #ccc;
	margin-bottom: 30px;
}
#learning-coming-soon ul li {
	list-style: none;
	background-image: url(images/branded-bullet.png);
	background-repeat: no-repeat;
	background-position: -2px 3px;
	margin: 0 0 10px 16px;
	padding: 0 0 0 20px;

}

jQuery:

// Outcome Toggle
$('.read-outcome').toggle(function() {
  		$(this).parent('.read-outcome-line').prev('.show-outcome').animate( {'max-height': '500px', 'paddingBottom': '30px'}, 500);
		$(this).empty();
		$(this).html("CLOSE OUTCOME");
}, function() {	
		$(this).parent('.read-outcome-line').prev('.show-outcome').animate( {'max-height' : '0px' ,'paddingBottom': '0px'}, 500 );
		$(this).empty();
		$(this).html("VIEW OUTCOME");
});

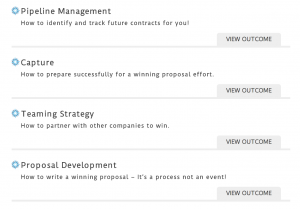
The result visually:


Screen Shot 2014-05-02 at 3.14.33 PM

Screen Shot 2014-05-02 at 3.14.45 PM


How to Search Multiple Custom Post Types and Style Each Post Type Result Differently

This will allow you to search Custom Post Types in addition to regular posts and allow you to show the results differently dependent on post type.

First put a filter in your theme’s function.php file that will group the results by post type.

add_filter('posts_orderby', 'group_by_post_type', 10, 2);
function group_by_post_type($orderby, $query) {
    global $wpdb;
    if ($query->is_search) {
        return $wpdb->posts . '.post_type DESC';
    }
    // provide a default fallback return if the above condition is not true
    return $orderby;
}

Next, pull open your theme’s search.php file and tackle the following code. This example will separate your Blog “post” Blog Post type, and your “product” Products post type.


    post_type){
        $typecount = $typecount + 1;
        if ($typecount > 1){
            echo '
'; //close type container } // save the post type. $last_type = $post->post_type; //open type container switch ($post->post_type) { case 'post': echo "

Blog Results

"; break; case 'product': echo "

Product Search Results

"; break; } } ?>

  • No results found.